
Windows 11 includes a perfectly capable graphical Disk Management utility, but sometimes the command line is the better tool.
That is where DiskPart comes in.
DiskPart is Windows’ built-in command-line utility for managing disks, partitions, volumes, and virtual hard disks. It can create and delete partitions, format volumes, assign drive letters, shrink and extend volumes, and even completely erase a disk.
That power comes with an obvious downside: DiskPart does not give you the same visual safety net as Disk Management.
If you select the wrong disk and run a destructive command, DiskPart will do exactly what you told it to do.
The most important rule is therefore simple:
Always verify which disk, partition, or volume currently has focus before running a command that changes or deletes data.
This guide explains how to use DiskPart safely in Windows 11, from creating a basic data partition to shrinking, extending, formatting, and completely reinitializing a drive.
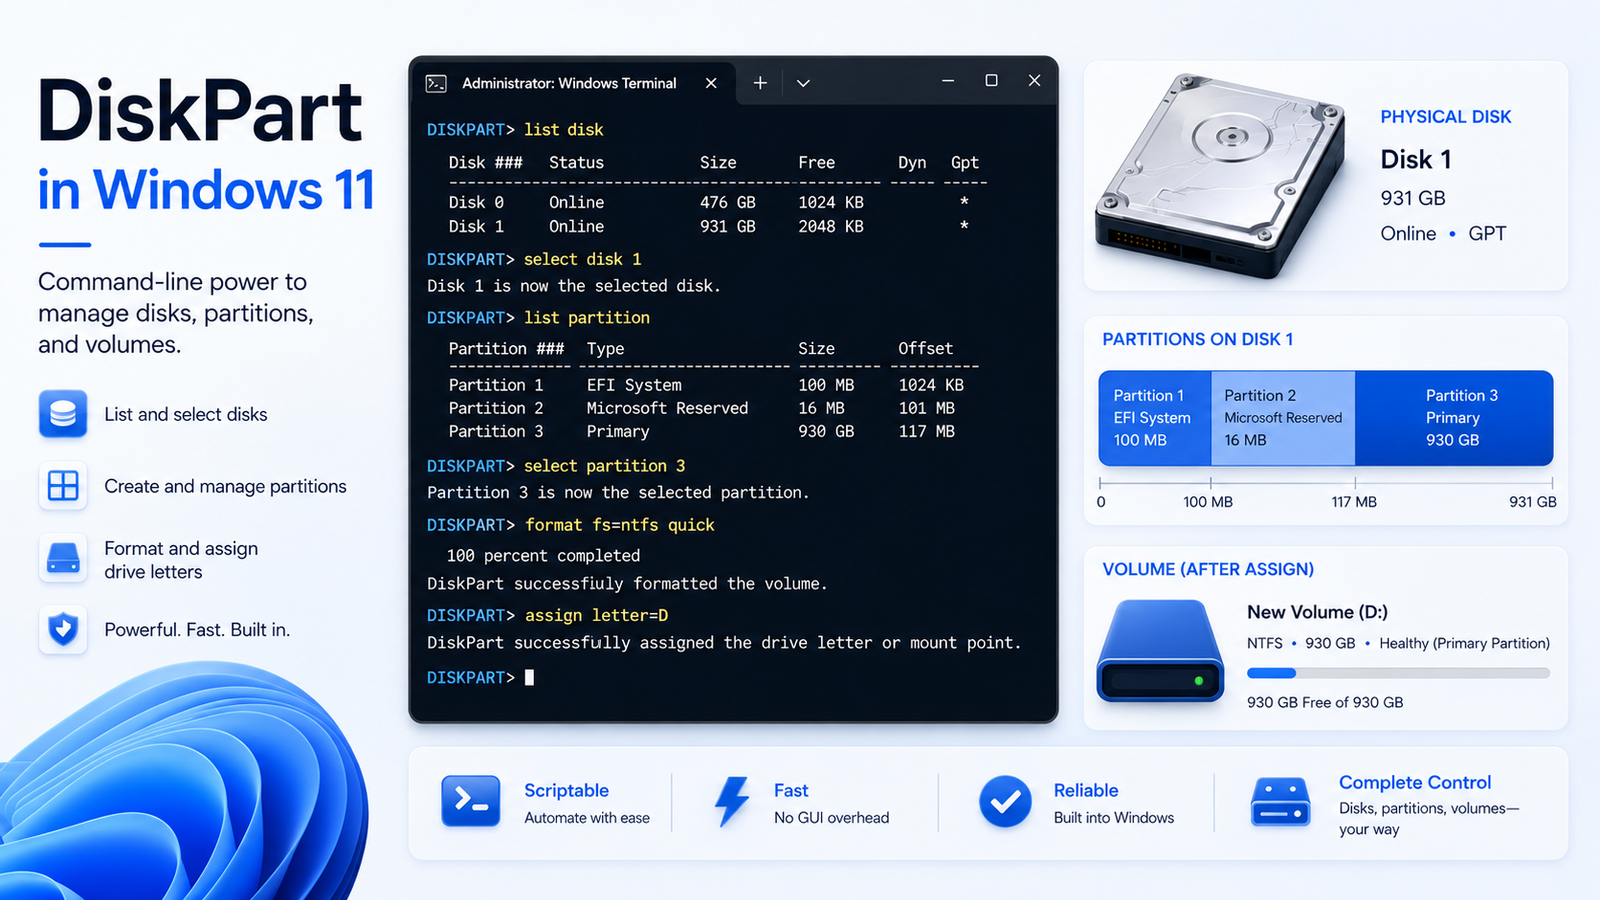
What Is DiskPart?
DiskPart is a command interpreter included with Windows 11.
Instead of managing storage through graphical menus, you enter commands such as:
list disk
select disk 1
create partition primary
format fs=ntfs quick
assign letter=D
Microsoft describes DiskPart as a tool for managing disks, partitions, volumes, and virtual hard disks. It requires administrator privileges.
DiskPart is particularly useful when:
- You are working from Command Prompt or Windows Recovery.
- Disk Management cannot perform the operation you need.
- You are preparing a new SSD or hard drive.
- You need precise control over partition sizes.
- You are repairing or preparing disks during Windows installation.
- You want to automate disk setup with scripts.
For normal everyday storage management, Disk Management may still be easier.
DiskPart becomes valuable when you want direct, predictable control.
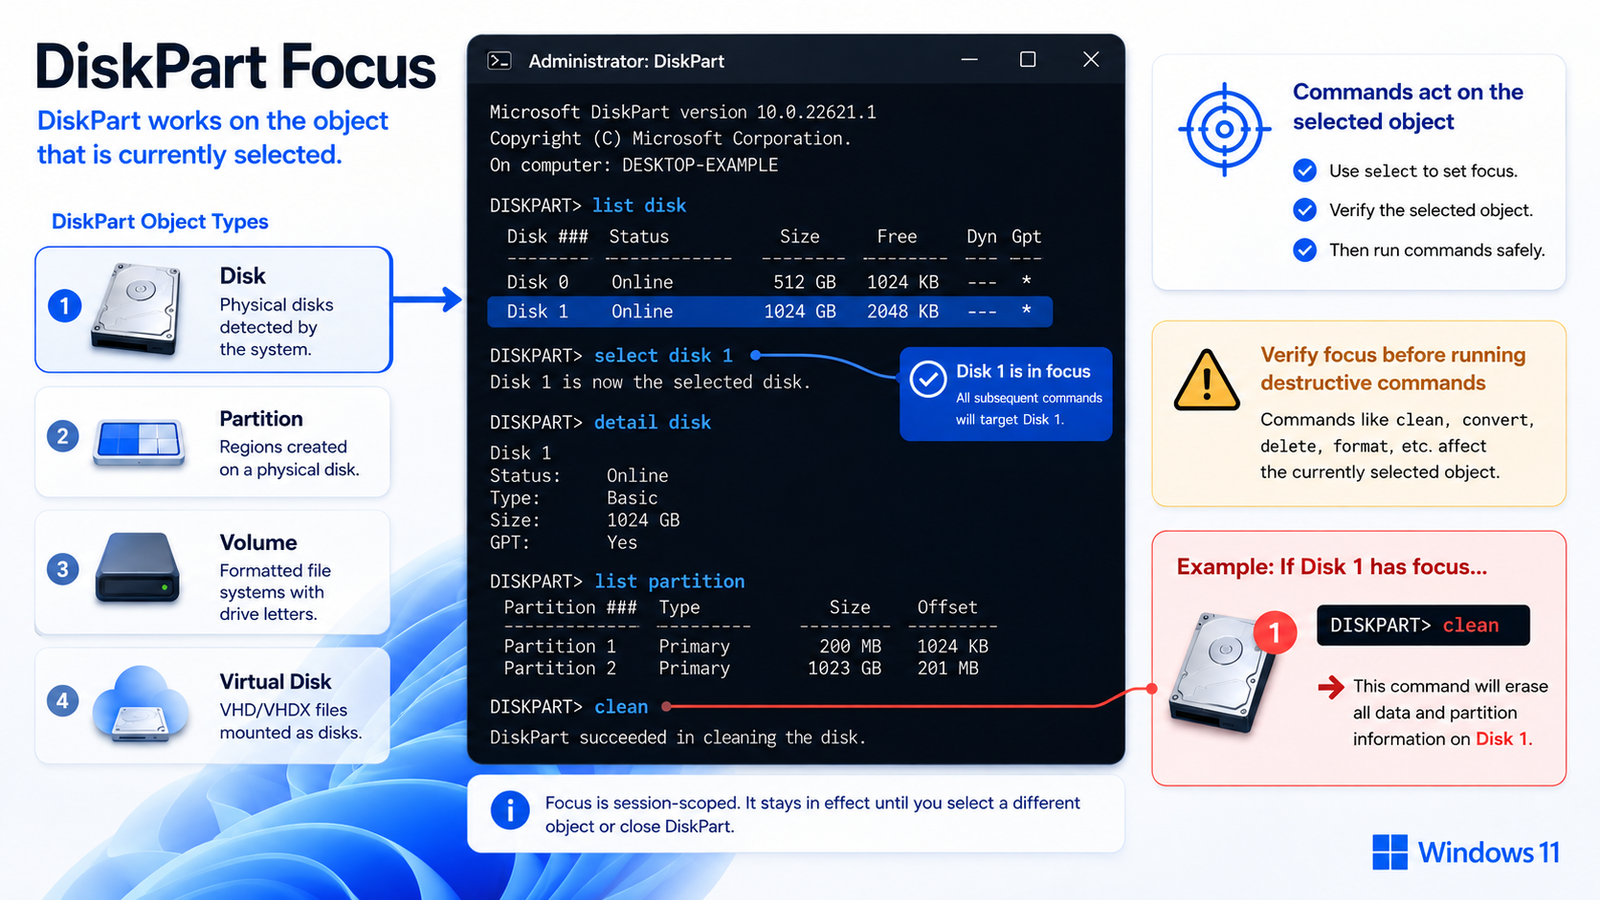
The Most Important DiskPart Concept: Focus
DiskPart operates on the object that currently has focus.
That object might be a:
Disk
Partition
Volume
Virtual disk
For example:
select disk 1gives Disk 1 focus.
If you then run:
cleanDiskPart applies that command to Disk 1.
If Disk 1 is the wrong drive, you have a serious problem.
Microsoft’s documentation specifically explains that you first list objects and then select one to give it focus. Commands entered afterward act on the selected object until focus changes.
This is why good DiskPart workflows repeatedly use commands such as:
list disk
list volume
list partition
detail disk
before performing destructive operations.
Before You Start
Back up important data before changing partitions.
Even commands that normally preserve files, such as shrinking or extending a volume, alter the structure of the disk.
For commands such as:
format
delete partition
clean
the risk is much greater.
You should also make sure you know:
- Which physical disk you want to modify.
- Its approximate capacity.
- Which partitions are already on it.
- Which drive letter belongs to the volume you want.
- Whether the disk contains Windows, recovery partitions, or another operating system.
Do not assume that:
Disk 0is always the disk you intend to modify.
Microsoft specifically warns that disk numbers can differ between systems and can even be reassigned.
How to Open DiskPart in Windows 11
Open Windows Terminal, Command Prompt, or PowerShell as administrator.
Then enter:
diskpartThe prompt should change to:
DISKPART>DiskPart requires administrator-level privileges for disk management operations.
You can leave DiskPart at any time with:
exitStart by Inspecting Your Disks
Before creating or changing anything, run:
list diskYou might see something similar to:
Disk ###  Status         Size     Free     Dyn  Gpt
--------  -------------  -------  -------  ---  ---
Disk 0    Online          953 GB      0 B        *
Disk 1    Online         1863 GB   500 GB        *
Disk 2    Online          465 GB   465 GB
list disk shows information including disk size, available free space, and whether the disk uses GPT or MBR.
Suppose the drive you want is the 465 GB disk.
Select it:
select disk 2DiskPart should respond:
Disk 2 is now the selected disk.
Before going any further, inspect it:
detail diskThen list its partitions:
list partitionThis extra verification takes seconds and can prevent a very expensive mistake.
How to Create a New Partition with DiskPart
Let’s start with the safest common scenario:
You have a disk containing unallocated space, and you want to turn some or all of it into a new Windows partition.
The general process is:
Select disk
Create partition
Format partition
Assign drive letter
Microsoft’s current DiskPart documentation follows this same basic workflow.
1. List the Disks
Enter:
list diskIdentify the correct drive by capacity and other information.
2. Select the Disk
For example:
select disk 1Then verify it:
detail disk3. Create a Primary Partition
To use all available unallocated space:
create partition primaryIf you do not specify a size, DiskPart uses the available space in the selected region.
To create a partition with a specific size, use:
create partition primary size=102400DiskPart specifies partition sizes in megabytes.
In this example:
102400 MB ≈ 100 GBMicrosoft documents the syntax as:
create partition primary size=<n>where <n> is the partition size in MB.
After DiskPart creates the partition, focus automatically changes to that new partition.
4. Format the Partition
For a standard Windows data partition using NTFS:
format fs=ntfs quickYou can also give it a label:
format fs=ntfs label="Data" quickMicrosoft’s DiskPart example uses the same format syntax for quickly creating an NTFS filesystem.
5. Assign a Drive Letter
To assign drive letter D:
assign letter=DThe assign command gives the volume in focus a drive letter or mount point. If you do not specify a letter, Windows can assign the next available one.
Your new partition should now appear in File Explorer.
Complete Example
The entire process might look like:
diskpart

list disk
select disk 1
detail disk

create partition primary size=102400
format fs=ntfs label="Data" quick
assign letter=D

exit
That creates an approximately 100 GB NTFS partition and mounts it as:
D: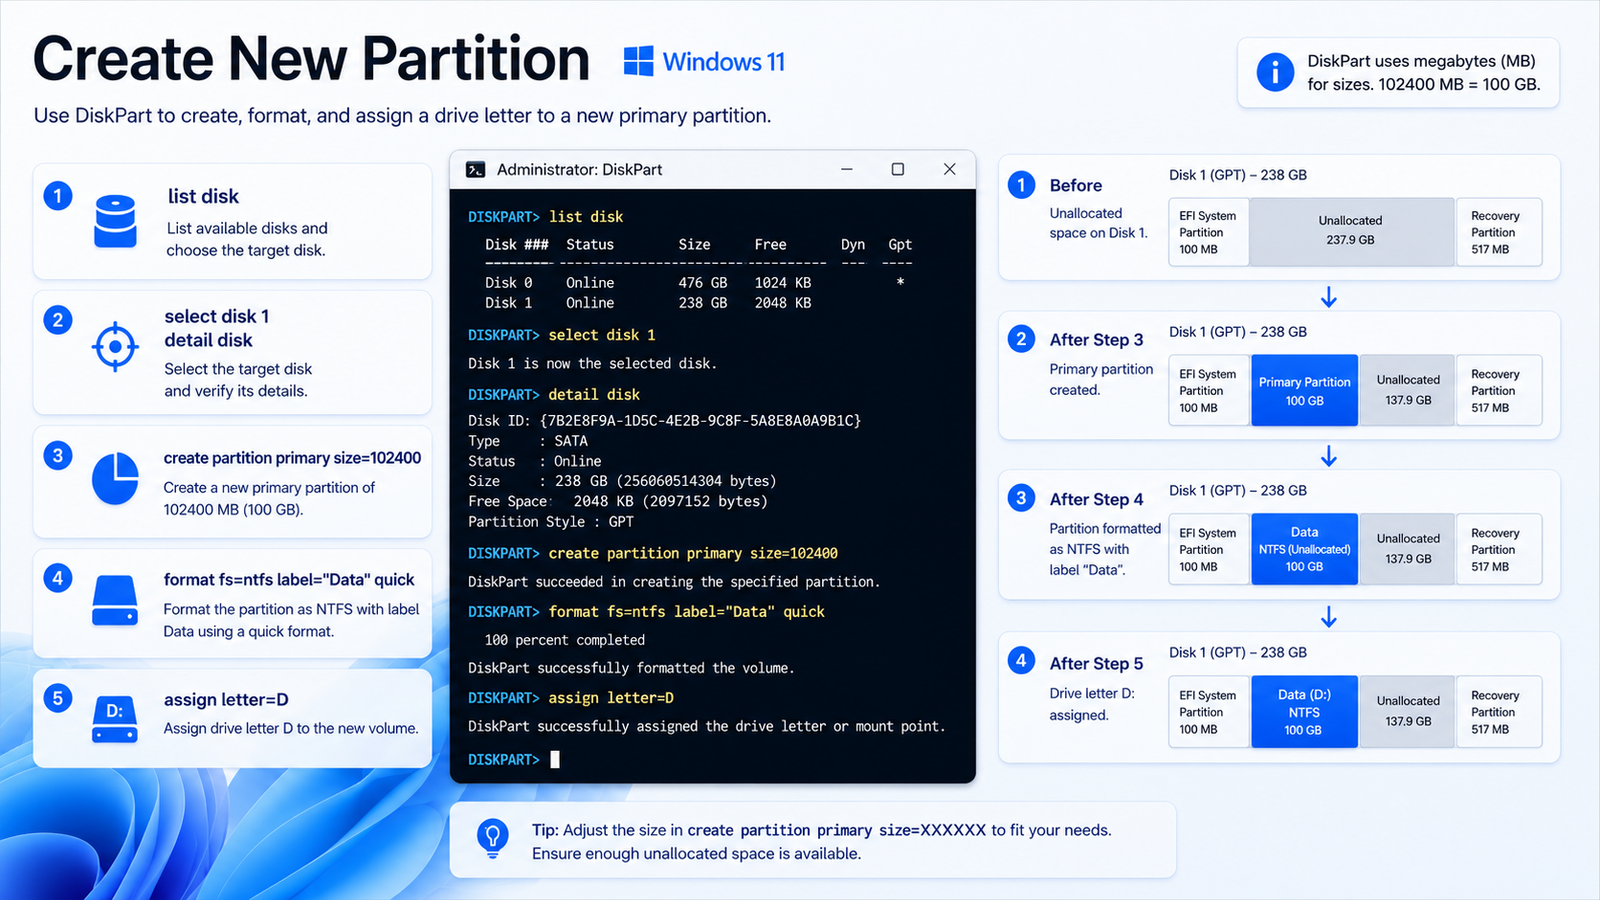
How to Use All Remaining Free Space
If you want the new partition to consume all available unallocated space, omit the size argument.
Use:
select disk 1
create partition primary
format fs=ntfs label="Data" quick
assign letter=D
Because no partition size was provided, DiskPart creates the primary partition using the available space in the region.
How to Split a Drive into Multiple Partitions
Suppose you have a blank 1 TB secondary SSD and want:
250 GB   Work
500 GB   Games
Rest     Archive
You could create the partitions one after another.
For example:
diskpart
list disk
select disk 1
detail disk
Create the first partition:
create partition primary size=256000
format fs=ntfs label="Work" quick
assign letter=D
Create the second:
create partition primary size=512000
format fs=ntfs label="Games" quick
assign letter=E
Then use the remaining space:
create partition primary
format fs=ntfs label="Archive" quick
assign letter=F
The resulting layout would look approximately like:
1 TB SSD
│
├── 250 GB    D: Work
├── 500 GB    E: Games
└── Remaining F: Archive
The exact capacity Windows displays can differ slightly because storage manufacturers and operating systems may represent disk capacity differently.
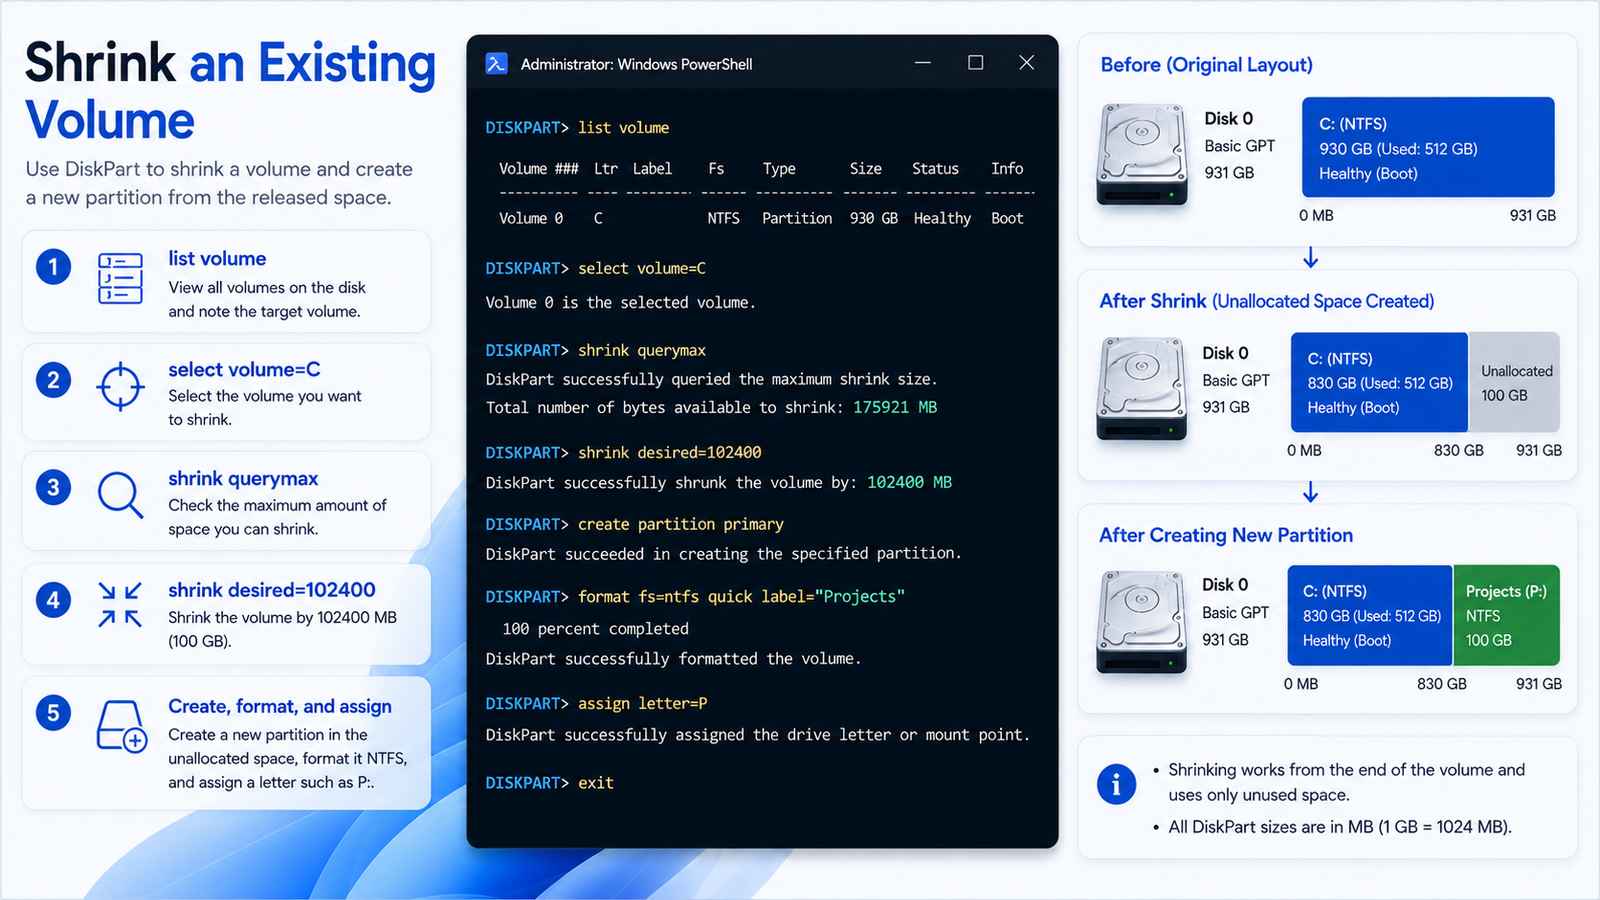
How to Shrink an Existing Partition with DiskPart
You do not need to erase an existing NTFS volume to make room for another partition.
DiskPart can shrink a selected volume and turn the released space into unallocated storage. The shrink command works by reducing the volume from unused space at its end.
First list the volumes:
list volumeYou might see:
Volume ###  Ltr  Label       Fs     Type        Size
----------  ---  ----------  -----  ----------  -------
Volume 0     C               NTFS   Partition    700 GB
Volume 1     D   Data        NTFS   Partition    250 GB
Suppose you want to shrink C:.
Select it:
select volume=CMicrosoft allows volumes to be selected by either number or drive letter.
Before choosing a size, ask DiskPart how much the volume can currently be reduced:
shrink querymaxDiskPart reports the maximum shrink space in MB.
To shrink the volume by approximately 100 GB:
shrink desired=102400That releases roughly 100 GB as unallocated space.
You can then create a new partition:
create partition primary
format fs=ntfs label="Projects" quick
assign letter=P
The full example is:
diskpart

list volume
select volume=C
shrink querymax
shrink desired=102400

create partition primary
format fs=ntfs label="Projects" quick
assign letter=P

exit
Important: shrink does not work on EFI System Partitions, recovery partitions, or OEM partitions. Microsoft also documents that shrinking is supported for NTFS volumes or volumes without a filesystem
How to Extend a Partition with DiskPart
DiskPart can also add unallocated space to an existing partition.
First list the volumes:
list volumeSelect the one you want to extend:
select volume=DThen use:
extendWithout a size argument, DiskPart uses the available contiguous free space.
To add a specific amount instead:
extend size=51200That adds approximately 50 GB.
On a basic disk, the unallocated space normally needs to be on the same disk and immediately follow the partition you want to extend.
For example:
Before:

|------- D: -------|---- Unallocated ----|

After:

|--------------- D: ---------------------|
This will generally work.
But this arrangement will not:
|---- D: ----|---- E: ----|---- Unallocated ----|
because E: sits between D: and the free space.
Microsoft documents this contiguous-space requirement for extending partitions on basic disks.
How to Change a Drive Letter with DiskPart
DiskPart can assign a new drive letter to a selected volume.
Start with:
list volumeSelect the volume:
select volume=3Then assign a new letter:
assign letter=RYou can also select it directly using its existing drive letter:
select volume=DMicrosoft’s assign command supports assigning a specific drive letter to the volume currently in focus.
Be careful when changing drive letters for volumes containing installed applications. Programs may expect their files to remain at the original path.
How to Format a Partition with DiskPart
To format an existing partition, first select the correct volume.
For example:
list volume
select volume=4
Then:
format fs=ntfs quick
Or:
format fs=ntfs label="Backup" quick
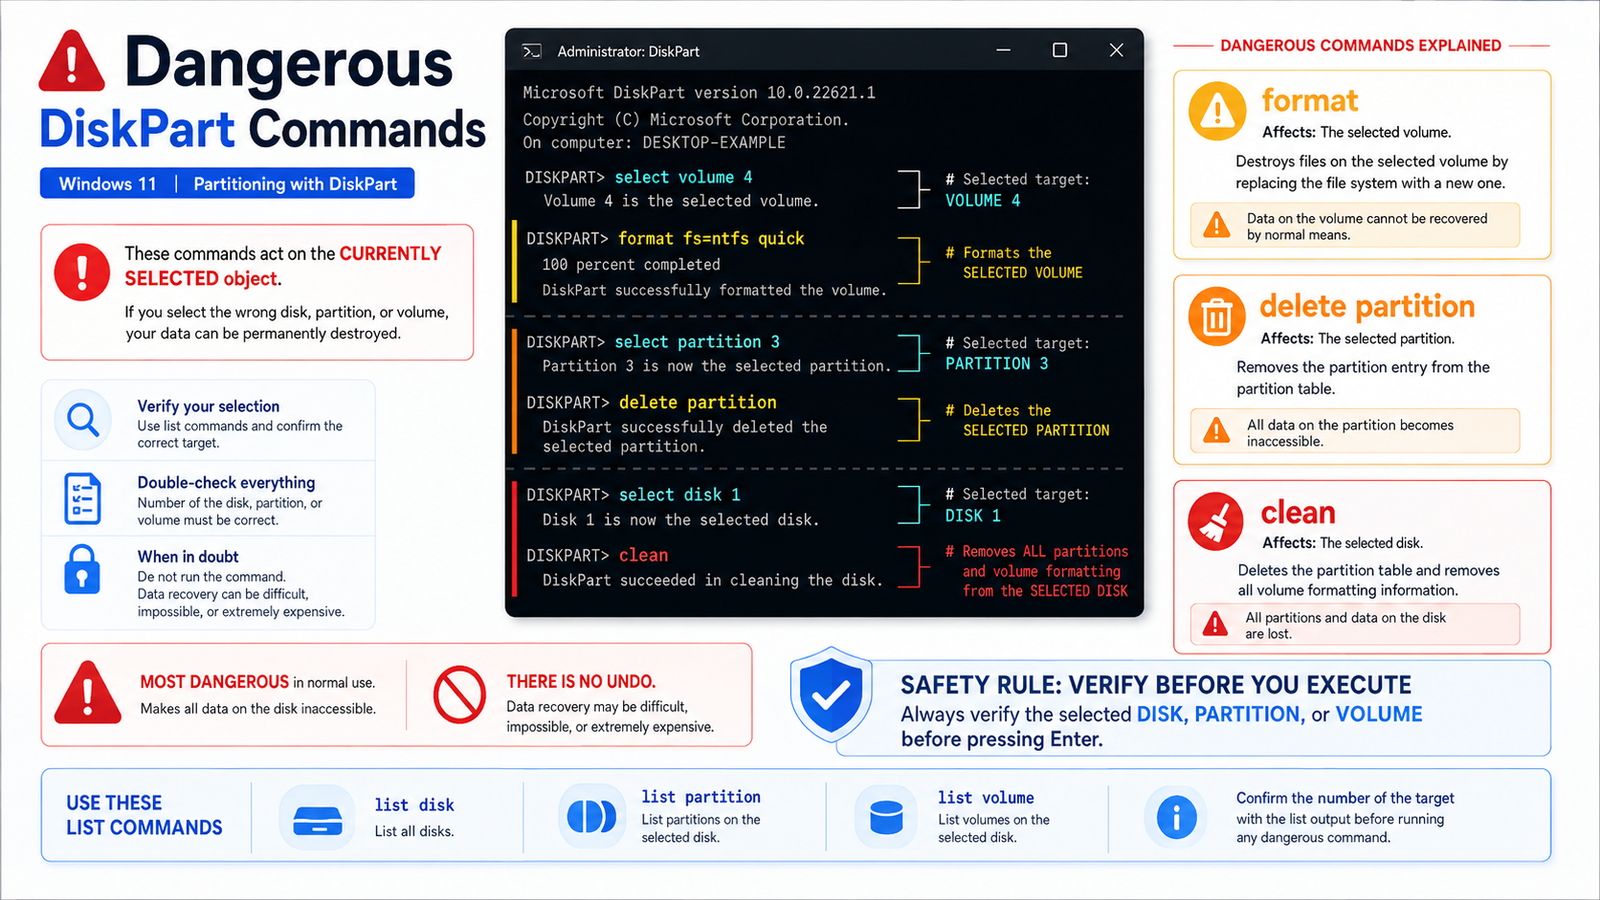
Formatting creates a new filesystem on the selected volume and destroys the files currently stored there.
Formatting is destructive. Verify the selected volume before pressing Enter.
Microsoft’s documentation notes that formatting a hard drive can delete the data stored on that volume.
How to Delete a Partition
Deleting a partition makes its space unallocated.
Start by selecting the physical disk:
list disk
select disk 1
Display its partitions:
list partitionSelect the partition:
select partition 3Then delete it:
delete partitionDiskPart deletes the partition currently in focus.
Do not casually use:
delete partition overrideThe override option allows DiskPart to delete partition types it would normally protect. Microsoft specifically warns about the risks involved, particularly with dynamic disks.
For ordinary Windows partition management, avoid override unless you know exactly why it is necessary.
The Dangerous One: clean
DiskPart’s:
clean
command is fundamentally different from deleting one normal partition.
It removes the partition and volume formatting information from the selected disk. Microsoft describes it as removing partition or volume formatting from the disk that has focus.
That means this sequence:
select disk 1
clean
does not simply “clean up some files.”
It removes the disk’s existing partition layout.
Do not run clean on a disk containing data you want to keep.
Before ever using it, verify the disk with:
list disk
select disk 1
detail disk
Then verify it again.
clean is useful when you deliberately want to completely reinitialize a secondary drive or prepare a disk for a fresh Windows installation.
It should not be part of your normal partition-creation workflow.
How to Completely Reinitialize a Drive as GPT
Modern Windows 11 PCs generally use UEFI firmware with GPT-partitioned system drives. Microsoft states that GPT is the modern partition style associated with UEFI, while MBR is the older legacy BIOS-oriented scheme.
For a secondary disk that you intentionally want to erase completely, the sequence is:
diskpart

list disk
select disk 1
detail disk

clean
convert gpt

create partition primary
format fs=ntfs label="Storage" quick
assign letter=D

exit
The critical commands are:
clean
convert gpt
Microsoft requires existing partitions and volumes to be removed before converting a disk between MBR and GPT using this DiskPart method.
Again:
This method erases the existing partition layout. Do not use it as a non-destructive way to convert a disk containing data.
Using DiskPart During Windows 11 Installation
DiskPart can also be launched from Windows Setup.
This is particularly useful if Windows Setup reports a partition-style problem or you deliberately want to completely erase the target drive.
From the Windows installer, you can open Command Prompt with:
Shift + F10Then start DiskPart:
diskpartList the drives:
list diskSelect the target:
select disk 0After carefully confirming that it is the correct disk, you can wipe it and convert it to GPT:
clean
convert gpt
exit
Microsoft documents this procedure for manually wiping a drive and preparing it as GPT from Windows Setup.
Afterward, return to Windows Setup.
The drive should appear as unallocated space.
For a normal Windows 11 installation, you generally do not need to manually create every system partition yourself. Select the unallocated space and allow Windows Setup to create the partitions it requires. Microsoft documents this as the normal continuation after preparing the drive.
GPT or MBR for Windows 11?
For modern Windows 11 PCs, GPT is normally the appropriate partition style.
GPT works with UEFI firmware, supports more than four partitions, and supports disks larger than 2 TB. Microsoft’s current documentation describes MBR as the older legacy BIOS partitioning scheme and GPT as the modern UEFI-oriented option.
You can see whether a disk uses GPT with:
list diskLook at the:
Gptcolumn.
An asterisk indicates GPT.
For example:
Disk ###  Status     Size     Free     Dyn  Gpt
--------  ---------  -------  -------  ---  ---
Disk 0    Online      953 GB      0 B        *
Disk 1    Online      465 GB   465 GB
Here, Disk 0 uses GPT.
Useful DiskPart Commands to Remember
| Command | What it does |
|---|---|
list disk | Displays physical disks |
list volume | Displays volumes |
list partition | Displays partitions on the selected disk |
select disk N | Selects a disk |
select volume N | Selects a volume |
detail disk | Shows details about the selected disk |
create partition primary | Creates a new primary partition |
format fs=ntfs quick | Quickly formats the selected volume as NTFS |
assign letter=D | Assigns a drive letter |
shrink querymax | Shows how much the selected volume can shrink |
shrink desired=N | Shrinks a volume by N MB |
extend | Extends a volume into available contiguous space |
delete partition | Deletes the selected partition |
clean | Removes partition information from the selected disk |
convert gpt | Converts an empty disk to GPT |
exit | Leaves DiskPart |
DiskPart’s official command reference confirms these operations and emphasizes that commands act on the object currently in focus.
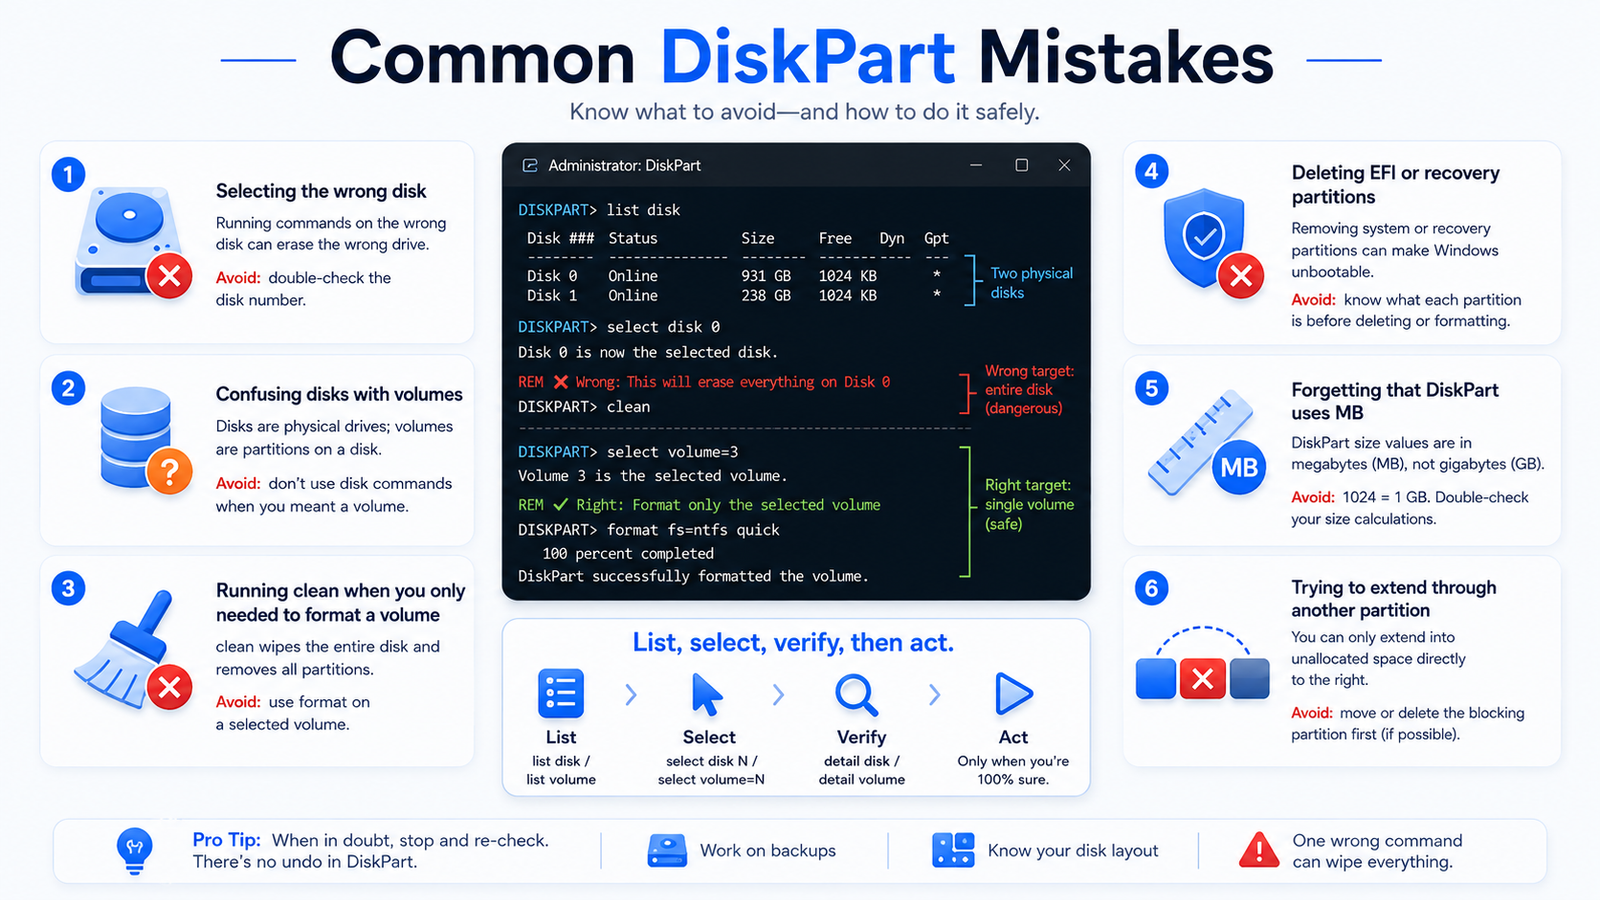
Common DiskPart Mistakes
Selecting the Wrong Disk
This is the biggest risk.
Never use:
select disk 0simply because an online tutorial assumes Disk 0 is the desired drive.
Instead:
list disk
select disk N
detail disk
Verify the capacity and disk information before proceeding.
Confusing Disks with Volumes
A physical SSD might be:
Disk 1while a filesystem on that SSD might appear as:
Volume 4They are not interchangeable.
Commands such as:
cleanoperate on a disk.
Commands such as:
shrinkoperate on the selected volume.
Understanding focus is essential.
Running clean When You Only Needed to Format
If you simply want to format one partition, do not wipe the entire physical drive.
Use:
select volume=N
format fs=ntfs quick
instead.
Deleting EFI or Recovery Partitions
A Windows system drive normally contains partitions that do not appear as ordinary drive letters.
Do not assume they are useless simply because File Explorer does not show them.
Avoid deleting EFI, recovery, or other system-related partitions unless you are deliberately wiping and reinstalling Windows.
Forgetting That DiskPart Uses MB
Commands such as:
create partition primary size=102400and:
shrink desired=102400express size in megabytes.
Trying to Extend Through Another Partition
On basic disks, DiskPart generally requires the unallocated space to immediately follow the partition you want to extend.
If another partition is in between, extend will not simply jump over it.
A Safe DiskPart Routine
When using DiskPart, develop the habit of checking your target repeatedly.
Instead of:
diskpart
select disk 1
clean
use:
diskpart

list disk
select disk 1
detail disk
list partition
Stop and verify what you see.
Only then run the command you actually need.
The extra few seconds are worth it.
DiskPart or Disk Management: Which Should You Use?
Disk Management is usually easier for straightforward desktop tasks such as shrinking a partition, creating a simple volume, or changing a drive letter.
DiskPart is better when you:
- Prefer command-line administration.
- Need to work from Windows Setup or recovery tools.
- Need commands that are difficult to perform through the GUI.
- Are preparing disks repeatedly.
- Need exact size values.
- Want a reproducible sequence of storage-management commands.
Neither tool is inherently better.
Disk Management prioritizes visibility.
DiskPart prioritizes control.
Should You Use DiskPart to Partition Windows 11?
DiskPart is one of those Windows utilities that becomes significantly more useful once you understand how it thinks.
The commands themselves are not particularly difficult:
list
select
create
format
assign
shrink
extend
delete
The important part is knowing what currently has focus.
For creating a partition from unallocated space, the basic workflow is:
list disk
select disk N
create partition primary
format fs=ntfs quick
assign letter=D
For dividing an existing NTFS volume:
list volume
select volume=C
shrink querymax
shrink desired=N
create partition primary
format fs=ntfs quick
assign letter=D
And for completely wiping and reinitializing a disk:
list disk
select disk N
detail disk
clean
convert gpt
That last workflow belongs in a different category from the first two.
Creating and resizing partitions can be routine disk management. clean is disk destruction followed by reconstruction.
Treat it accordingly.
If you remember only one DiskPart rule, make it this:
List the disks, select the target, verify the target, and only then make changes.