
Is your Windows 11 C drive full, even though you haven’t installed many programs or downloaded anything recently?
You’re not alone. Windows updates, temporary files, downloaded installers, large applications, and cloud-synced folders can gradually consume storage without making it obvious where the space went.
A nearly full C drive can also cause problems when installing Windows updates, downloading files, or running applications that need temporary storage.
Fortunately, you don’t need to reset Windows, format your SSD, or install questionable PC cleaning software just to recover some disk space.
In this guide, we’ll show you 7 safe ways to free up disk space on your Windows 11 C drive, using mostly built-in Windows tools.
We’ll also explain which files you should avoid deleting and what to do if your C drive keeps filling up.
Table of Contents
Quick answer: How to free up C drive space in Windows 11
If your C drive is almost full, start with Windows 11’s built-in storage tools.
The safest approach is to:
- Use Cleanup recommendations to remove unnecessary files.
- Enable Storage Sense for automatic cleanup.
- Run Disk Cleanup to remove eligible system files.
- Review Downloads and other large personal files.
- Uninstall applications you no longer need.
- Move personal files to another drive.
- Use OneDrive Files On-Demand to reduce local storage usage.
You don’t need to try every method. Start with the first one and check your free space after each step.
Important: Before deleting files or making significant changes, back up anything important. Some cleanup actions permanently remove data, and certain system-cleanup options can prevent you from rolling back a recent Windows upgrade.
Why is my C drive suddenly full in Windows 11?
Your C drive is usually the primary storage volume where Windows, installed applications, and many personal files are stored.
Even if you rarely save files manually, Windows and your applications can use more space over time.
Common causes include:
- Windows update files: Updates may download temporary installation packages and retain certain files needed for recovery.
- Temporary files: Applications and Windows create temporary data during normal operations.
- Large applications and games: Modern games, creative software, and development tools can consume significant storage.
- Downloads: ISO images, ZIP archives, videos, and installation packages may accumulate in your Downloads folder.
- Recycle Bin: Deleted files can continue using disk space until they are permanently removed.
- Cloud synchronization: Files marked for offline availability can occupy local storage.
- Previous Windows installations: After a major upgrade, Windows may temporarily retain files that allow you to return to the previous version.
If the C drive is filling up unexpectedly, the first step is to identify the categories using the most space.
Check what’s taking up space on your C drive
- Press Windows + I to open Settings.
- Select System > Storage.
- Wait while Windows calculates storage usage.
- Review the categories displayed under your C drive.
You may see categories such as:
- Installed apps
- Temporary files
- System & reserved
- Documents
- Pictures
- Other
Select a category to view additional information.
You can also open File Explorer > This PC to check the total capacity and remaining free space on your C drive.
For example, if Windows reports that a 256 GB system drive has only 4 GB free, you should investigate which categories are consuming storage before removing anything.
The amount of space you can safely recover depends on what’s actually stored on your computer.
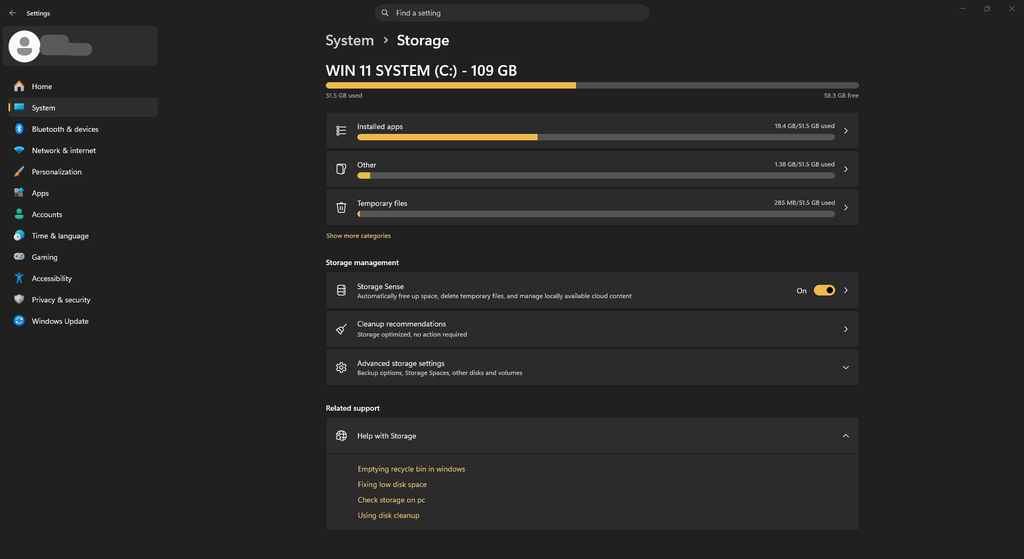
1. Free up space using Cleanup recommendations
Windows 11 includes a built-in feature called Cleanup recommendations, which helps identify files and applications that may no longer be needed.
For most users, this is the best place to start.
How to use Cleanup recommendations
- Open Settings.
- Navigate to System > Storage.
- Select Cleanup recommendations.
- Wait for Windows to analyze your storage.
- Review the suggested categories.
- Select only the items you are comfortable removing.
- Click Clean up for the relevant category.
Depending on your device, Windows may display:
| Category | What it contains |
|---|---|
| Temporary files | Temporary data and eligible cleanup items |
| Large or unused files | Files that may consume substantial storage |
| Files synced to the cloud | Locally stored copies of cloud files |
| Unused apps | Applications you may no longer need |
Don’t select everything automatically.
For example, a large file might be an important project archive, backup, or virtual machine image.
Review the file names and locations before deleting anything.
You should also be careful with previous Windows installation files. They can be useful if you need to roll back an update.
Microsoft provides additional guidance in its official Free up drive space in Windows documentation.
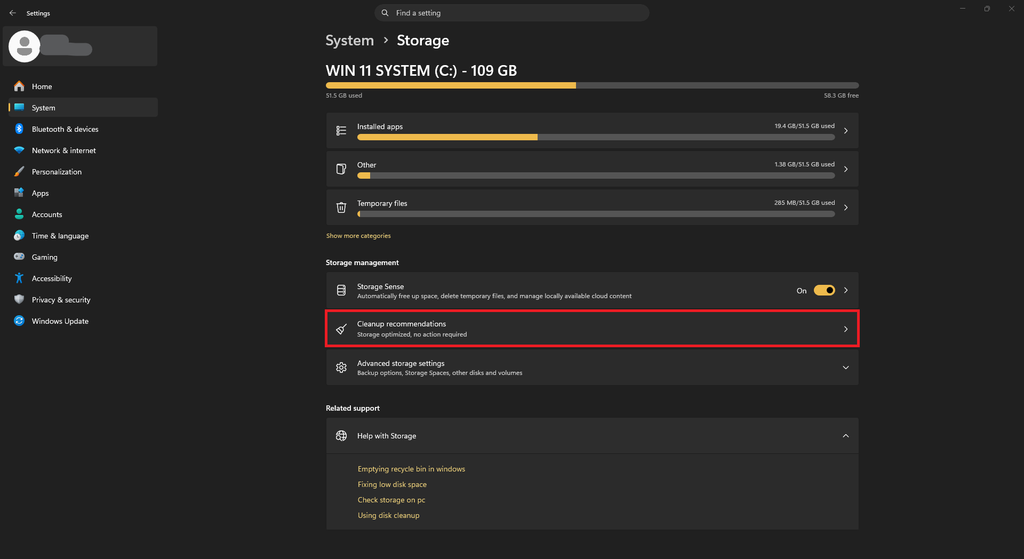
2. Enable Storage Sense to clean up files automatically
Storage Sense is another built-in Windows 11 feature designed to manage unnecessary files.
Unlike a one-time cleanup, Storage Sense can run automatically according to your settings.
It can help remove temporary files and manage items in your Recycle Bin.
How to enable Storage Sense
- Open Settings > System > Storage.
- Find Storage Sense.
- Turn it On.
- Select Storage Sense to view its configuration options.
- Review the cleanup schedule and file-retention settings.
You can configure how frequently Storage Sense runs and when it removes files from the Recycle Bin.
Depending on your settings and connected cloud services, you may also see options for Downloads and locally available cloud content.
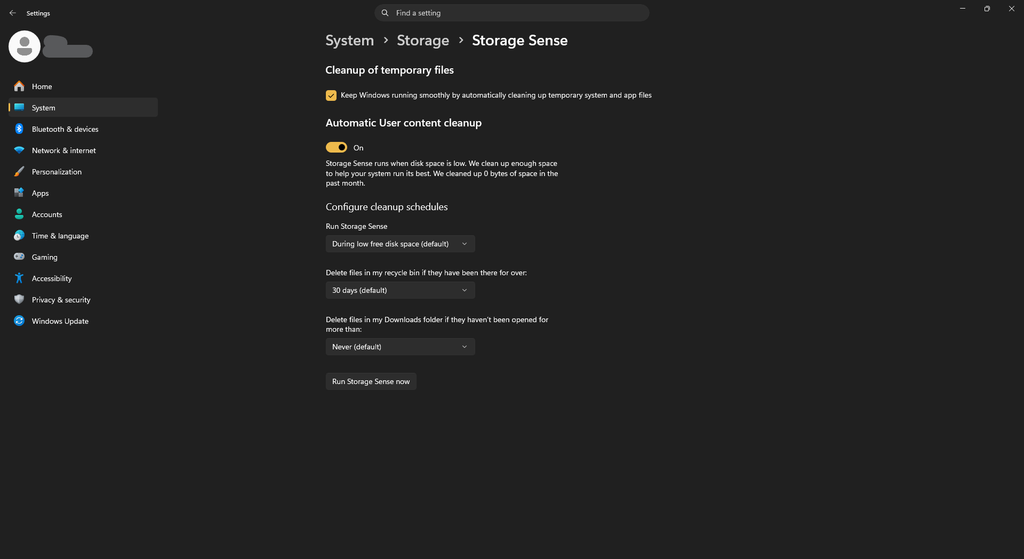
Recommended Storage Sense settings
For a typical personal computer:
- Enable automatic cleanup of unnecessary temporary system and application files.
- Choose a Recycle Bin retention period that gives you time to recover accidentally deleted files.
- Leave automatic Downloads cleanup disabled unless you’re certain you want it.
- Review cloud-content settings if you regularly need files available offline.
Important: Storage Sense can delete files from Downloads if you specifically configure it to do so. Don’t enable that option without understanding the consequences.
Storage Sense primarily manages your system drive, which is usually C:.
You can also open Storage Sense and use Run Storage Sense now to perform a cleanup manually.
For more details, read Microsoft’s Storage Sense documentation.
3. Run Disk Cleanup to remove unnecessary system files
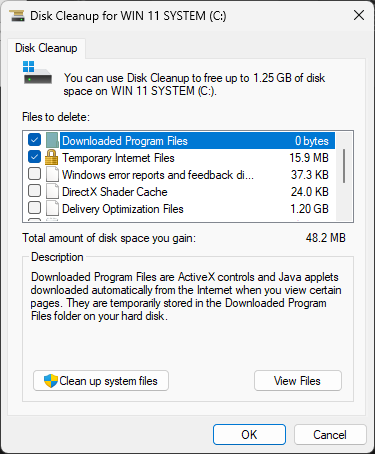
Windows 11 still includes the classic Disk Cleanup utility.
Although newer storage tools handle many everyday cleanup tasks, Disk Cleanup remains useful for reviewing certain temporary and system files.
How to open Disk Cleanup
- Open the Start menu.
- Type
Disk Cleanup. - Select the Disk Cleanup application.
- Choose your C: drive if Windows asks you to select a drive.
- Wait while Windows calculates available cleanup options.
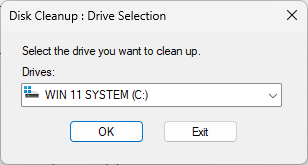
You may see entries such as:
- Temporary Internet Files
- Thumbnails
- Temporary files
- Delivery Optimization Files
- Recycle Bin
The categories displayed will depend on your Windows installation.
Review the descriptions before selecting anything.
When you’re ready, click OK, then confirm the cleanup.
Clean up Windows system files
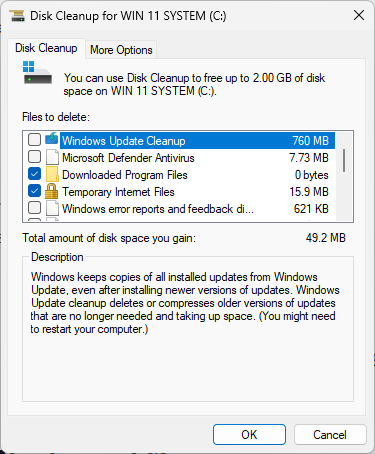
Disk Cleanup can also display eligible system-level cleanup options.
- Open Disk Cleanup.
- Select your C drive.
- Click Clean up system files.
- Select C: again if prompted.
- Wait for Windows to finish scanning.
- Review the available cleanup categories.
- Select the items you no longer need.
- Confirm the cleanup.
You may see Windows Update Cleanup or previous Windows installation files among the available categories.
Can you safely delete Windows.old?
After certain Windows upgrades, the Windows.old folder stores files associated with the previous installation.
These files may be needed if you decide to roll back to your previous Windows version.
Microsoft normally removes the previous version automatically after the rollback period, which is typically 10 days.
Warning: If you manually remove the previous Windows installation, you lose the option to use those files to return to the previous Windows version. That action cannot be undone.
If you recently upgraded Windows and haven’t confirmed that everything works correctly, consider keeping the rollback files.
Don’t manually delete the Windows.old folder through File Explorer. Use Windows’ supported storage-cleanup options if you decide to remove it.
For more information, see Microsoft’s guide to deleting a previous Windows version.
What if low storage is preventing Windows updates?
Windows needs available storage to download and install certain updates.
If an update is missing or installation fails because of insufficient space, cleaning temporary files may help.
For other update availability problems, check our related guide: Windows 11 26H2 Not Showing in Windows Update? 7 Ways to Fix It.
Remember that low storage is only one possible reason an update might fail or not appear.
4. Find and remove large files from Downloads and other folders
One of the easiest ways to recover disk space is to review files you downloaded months ago and no longer need.
The Downloads folder can contain surprisingly large files, especially if you frequently download software or operating system images.
Common examples include:
- Windows or Linux ISO files
- Old software installers
- ZIP and RAR archives
- Videos and recordings
- Duplicate downloads
- Large documents and project exports
Find large files in Downloads
- Press Windows + E to open File Explorer.
- Select Downloads from the navigation pane.
- Switch to Details view.
- Sort the files by Size, if available.
- Review the largest files first.
If the folder does not show file sizes clearly, use File Explorer’s search features or inspect individual file properties.
Delete only files that you recognize and no longer need.
Don’t remove an unfamiliar file just because it is large.
Check other personal folders
Your Videos, Desktop, Documents, and Pictures folders may also contain large files.
If you work with virtual machines, video editing projects, or software development environments, check the applications that manage those files before deleting them.
For example, deleting a virtual machine’s disk image will usually destroy the data stored in that virtual machine.
Empty the Recycle Bin
When you normally delete a file in Windows, it may move to the Recycle Bin instead of being immediately removed from your drive.
To recover that space:
- Open the Recycle Bin.
- Review its contents.
- Restore anything you still need.
- Select Empty Recycle Bin.
- Confirm the action.
Files removed from the Recycle Bin are not normally recoverable through the standard Recycle Bin restore process.
It’s better to double-check before emptying it.
5. Uninstall unused applications and games
Installed applications can consume a significant amount of storage.
Games, creative applications, development environments, and large productivity suites are especially worth reviewing.
How to uninstall apps in Windows 11
- Open Settings.
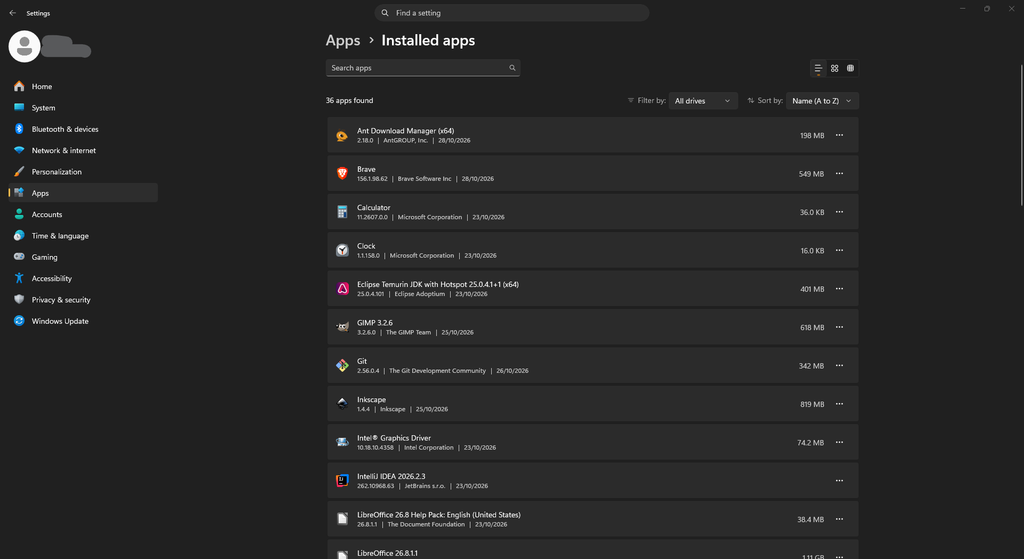
- Go to Apps > Installed apps.
- Review the installed applications.
- Sort by size where supported.
- Identify software you no longer use.
- Click the three-dot menu next to an application.
- Select Uninstall.
- Follow the instructions.
Some applications may not report their actual size accurately, so the list should be treated as a useful starting point rather than a perfect storage report.
Which applications should you remove?
Consider uninstalling:
- Games you no longer play.
- Trial software you no longer use.
- Duplicate applications.
- Old applications that you have already replaced.
- Development tools or SDKs you no longer need.
Avoid removing unfamiliar drivers, device utilities, or system components simply because you don’t recognize their names.
If you’re unsure what an application does, look it up before uninstalling it.
Tip: Uninstalling a program is generally safer than manually deleting its folder from C:\Program Files.
An application’s uninstaller can remove registered components and perform other cleanup tasks that deleting its folder would miss.
6. Move personal files to another drive
If your computer has another storage drive, moving large personal files can be an effective long-term solution.
For example, you might keep Windows and applications on C: while storing videos, photos, and archives on D: or an external SSD.
Move files to another drive
- Connect your external drive, if you’re using one.
- Open File Explorer.
- Browse to the folder containing your large files.
- Select the files you want to move.
- Copy them to a folder on the destination drive.
- Confirm that the copied files open correctly.
- Delete the originals from C: only after checking the copies and ensuring you have an appropriate backup.
Using copy-and-verify before deleting the originals is safer than immediately cutting and pasting important files.
Change where new files are saved
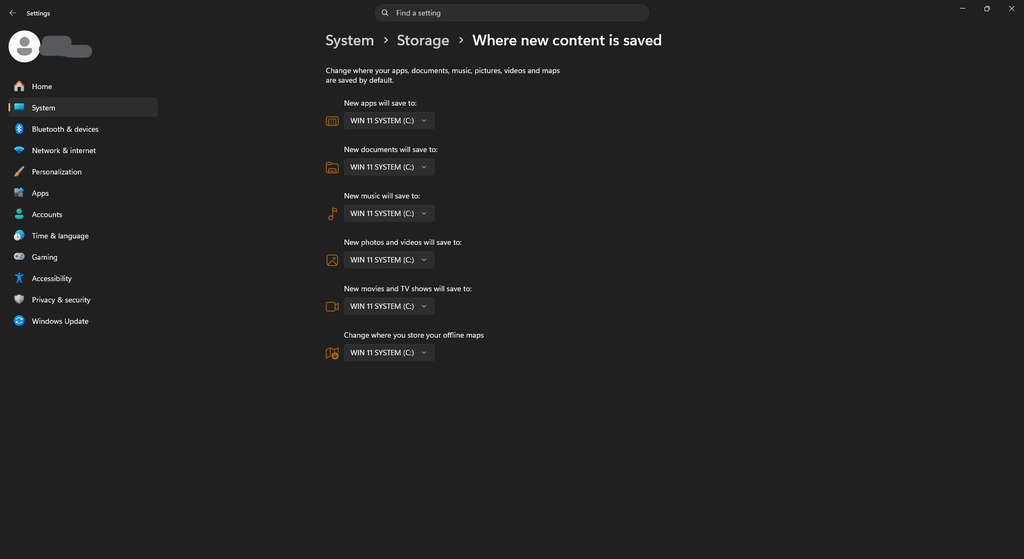
Windows 11 also provides settings for choosing where certain types of new content are saved.
- Open Settings > System > Storage.
- Expand Advanced storage settings.
- Select Where new content is saved.
- Choose another available drive for supported content types.
- Apply your changes.
The available options depend on your device and Windows configuration.
This won’t automatically move all existing files, but it can help prevent your C drive from filling up again.
Should you create another partition to fix a full C drive?
Not necessarily.
Creating another partition on the same physical disk doesn’t increase the disk’s total capacity.
Moving files from C: to another partition can free space within the C: volume, but it doesn’t create additional physical storage.
If you want to learn how partitions work, see our detailed tutorial: How to Partition a Drive Using DiskPart in Windows 11.
Important: DiskPart is an advanced disk-management tool. Commands that delete, clean, or format disks can permanently destroy data. You don’t need DiskPart for ordinary Windows storage cleanup.
7. Use OneDrive Files On-Demand to save local storage
If you use Microsoft OneDrive, Files On-Demand can help reduce the amount of disk space occupied by cloud-synced files.
Instead of downloading every file to your computer, OneDrive can display cloud-based files in File Explorer while keeping their contents online until you need them.
How OneDrive file availability works
OneDrive uses several file-status indicators.
| Icon status | Meaning |
|---|---|
| Blue cloud | File is online-only |
| Green check | File is available locally |
| Solid green circle with white check | File is configured to stay available offline |
Online-only files use very little local storage for their placeholders.
However, you’ll generally need an internet connection to open content that hasn’t been downloaded.
Make OneDrive files online-only
Before proceeding, confirm that OneDrive has completed syncing the files you want to keep in the cloud.
Then:
- Open File Explorer.
- Navigate to your OneDrive folder.
- Select a synced file or folder.
- Right-click it.
- Choose Free up space, if available.
OneDrive removes the local downloaded copy while retaining the synced file in your cloud storage.
You should still see the file in File Explorer.
When you open an online-only file, OneDrive can download it again.
When should you avoid this method?
Don’t make important files online-only if you regularly need them without internet access.
Likewise, don’t use this method until you have confirmed your files are successfully synced.
Important: Using OneDrive’s Free up space option is not the same as deleting a file. Deleting a file from a synced OneDrive folder can remove it from your cloud storage and other synchronized devices as well.
Read Microsoft’s official OneDrive Files On-Demand guide for more information.
What should you NOT delete from your Windows 11 C drive?
When trying to recover storage, it’s tempting to open C: and remove folders that appear unusually large.
That’s not a good idea.
Some Windows folders contain essential operating system files, recovery components, installed applications, or data used by active programs.
Avoid manually deleting or modifying the following:
| File or folder | Why you should avoid deleting it manually |
|---|---|
C:\Windows | Contains essential Windows system files |
C:\Windows\WinSxS | Stores Windows servicing components |
C:\Program Files | Contains installed application files |
C:\Program Files (x86) | Contains installed application files |
C:\ProgramData | Contains shared application data |
C:\Users\<username>\AppData | Contains application settings, caches, and potentially important user data |
pagefile.sys | Used for virtual memory |
| Recovery or EFI partitions | May be required for booting or recovering Windows |
The AppData folder, for example, may include temporary caches, but it can also hold browser profiles, application databases, game saves, and other important information.
Use Windows’ built-in cleanup options or an application’s own maintenance tools rather than deleting unknown files manually.
Are third-party PC cleaner apps necessary?
For normal storage maintenance, usually not.
Windows 11 already includes Storage Sense, Cleanup recommendations, Disk Cleanup, and application management features.
Be especially cautious with utilities that promise enormous performance improvements, automatic registry cleaning, or removal of supposedly unnecessary system files.
Deleting the wrong data can create more problems than a low-storage warning.
Windows 11 C drive still full? Try these checks
If you’ve followed the seven methods and your C drive remains nearly full, return to Settings > System > Storage and review the largest categories again.
The next step depends on what you find.
| Problem | Recommended next step |
|---|---|
| Temporary files occupy substantial space | Review Cleanup recommendations and Disk Cleanup |
| Games or applications occupy most storage | Uninstall or relocate supported applications |
| Downloads is unusually large | Review large files and duplicates |
| Personal media consumes the drive | Move verified copies to another storage device |
| OneDrive files occupy local storage | Review Files On-Demand settings |
| System & reserved takes significant space | Investigate before changing system settings |
| Storage disappears unexpectedly | Check recent downloads, application activity, and run a malware scan |
If storage consumption increases rapidly without an obvious explanation, consider running a security scan:
- Open Windows Security.
- Select Virus & threat protection.
- Choose Quick scan.
- Follow any security recommendations.
Not every unexplained storage increase is malware-related. Windows updates, application caches, and other legitimate processes may also be responsible.
If your computer has a very small SSD and normal cleanup isn’t enough, a larger storage drive may be the most practical long-term solution, provided your device supports upgrading it.
Frequently asked questions
Why is my C drive full for no reason in Windows 11?
Your C drive may be filling up because of temporary files, Windows updates, installed applications, downloaded archives, locally synced cloud content, or other data that isn’t immediately visible in File Explorer.
Use Settings > System > Storage to identify which categories consume the most space.
Is it safe to delete temporary files in Windows 11?
Generally, removing unnecessary temporary files through Windows’ built-in cleanup tools is safe when you review the selected categories.
However, some cleanup categories may include files you want to keep, such as previous Windows installation files, Downloads, or Recycle Bin contents.
Always review the options first.
How much free space should Windows 11 have?
There’s no single amount that guarantees optimal performance for every PC.
Windows needs free storage for updates, temporary files, and normal system operations. The exact amount required varies depending on the update, applications, and hardware.
As a practical precaution, avoid keeping your system drive nearly full and leave additional working space whenever possible.
Can I delete Windows.old to free up space?
Yes, Windows provides a supported method for removing previous installation files when they’re no longer needed.
However, doing so removes the corresponding rollback option.
If you recently upgraded and might need to return to the previous version, don’t delete those files yet.
Does Storage Sense delete my personal files?
Storage Sense focuses on unnecessary files and uses configurable cleanup rules.
With default settings, Downloads is not automatically cleaned simply because Storage Sense is enabled. However, optional settings can allow it to delete files from Downloads after a specified period.
Review those settings before enabling automatic cleanup.
Why is my C drive still full after deleting files?
The files may still be in the Recycle Bin, or other data may occupy most of the available storage.
Check the Recycle Bin, review Windows Storage settings, and identify the largest remaining categories.
If you moved files to another folder on the same C: volume, that won’t free space on C:.
Can I increase C drive space without formatting Windows?
Sometimes.
If another physical drive is available, moving personal files can free space on C: without formatting Windows.
In some disk configurations, it may also be possible to extend the C: partition into suitable unallocated space. However, partition changes have additional requirements and risks.
For everyday cleanup, use Windows storage tools before attempting partition modifications.
Final thoughts
A full C drive can be frustrating, but fixing it doesn’t have to involve risky commands, registry changes, or reinstalling Windows.
For most Windows 11 users, the safest starting point is Cleanup recommendations, followed by Storage Sense and Disk Cleanup.
If those tools don’t recover enough space, review large personal files, uninstall unused applications, and consider moving data to another storage device.
If you use OneDrive, Files On-Demand can also help reduce local storage usage.
The key is to understand what’s occupying your drive before deleting anything.
Start with the built-in tools, protect your personal files, and avoid manually removing Windows system components.
Last reviewed: October 28, 2026. Instructions are based on Microsoft’s Windows 11 documentation. Available options may vary with your Windows version, device configuration, and installed applications.